在现代应用开发中,系统的实时监控和维护变得至关重要。Spring Boot 3.3 的 Actuator 模块为开发者提供了一整套强大的监控功能,使得应用程序的健康状况、性能指标、用户行为及安全性得以全方位掌握和管理。本文将详细介绍如何配置和使用 Actuator,并展示如何将这些监控数据在前端页面中可视化。
Spring Boot 3.3 的 Actuator 模块提供了一整套全面的监控功能,帮助开发者更好地管理和维护应用程序。主要功能包括:
这些功能使得开发者能够实时获取应用的运行状态,优化系统性能,提升用户体验,并增强系统的安全性。接下来,我们将展示如何配置 Actuator 及其功能,并如何在前端页面中展示这些监控数据。
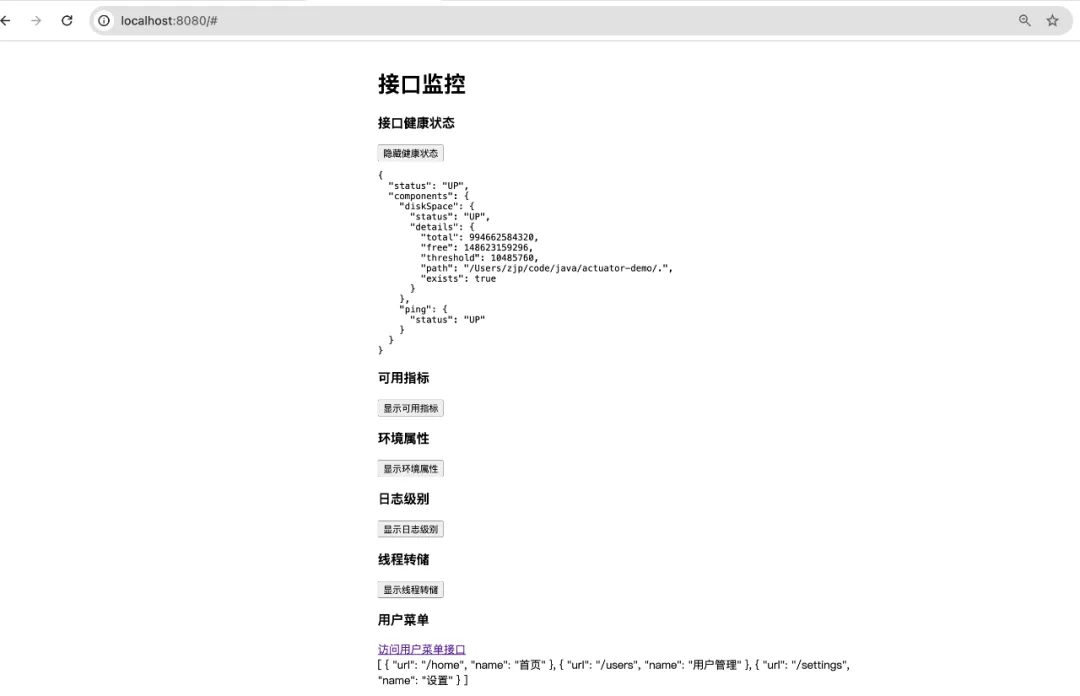
运行效果:
 图片
图片
若想获取项目完整代码以及其他文章的项目源码,且在代码编写时遇到问题需要咨询交流,欢迎加入下方的知识星球。
首先,确保你的 pom.xml 文件中包含 Actuator 和 Thymeleaf 的依赖。
<?xml versinotallow="1.0" encoding="UTF-8"?><project xmlns="http://maven.apache.org/POM/4.0.0" xmlns:xsi="http://www.w3.org/2001/XMLSchema-instance" xsi:schemaLocation="http://maven.apache.org/POM/4.0.0 https://maven.apache.org/xsd/maven-4.0.0.xsd"> <modelVersion>4.0.0</modelVersion> <parent> <groupId>org.springframework.boot</groupId> <artifactId>spring-boot-starter-parent</artifactId> <version>3.3.3</version> <relativePath/> <!-- lookup parent from repository --> </parent> <groupId>com.icoderoad</groupId> <artifactId>actuator-demo</artifactId> <version>0.0.1-SNAPSHOT</version> <name>actuator-demo</name> <description>Demo project for Spring Boot</description> <properties> <java.version>17</java.version> </properties> <dependencies> <!-- Spring Boot Starter Web --> <dependency> <groupId>org.springframework.boot</groupId> <artifactId>spring-boot-starter-web</artifactId> </dependency> <!-- Spring Boot Actuator --> <dependency> <groupId>org.springframework.boot</groupId> <artifactId>spring-boot-starter-actuator</artifactId> </dependency> <!-- Thymeleaf for HTML templates --> <dependency> <groupId>org.springframework.boot</groupId> <artifactId>spring-boot-starter-thymeleaf</artifactId> </dependency> <dependency> <groupId>org.springframework.boot</groupId> <artifactId>spring-boot-starter-test</artifactId> <scope>test</scope> </dependency> </dependencies> <build> <plugins> <plugin> <groupId>org.springframework.boot</groupId> <artifactId>spring-boot-maven-plugin</artifactId> </plugin> </plugins> </build></project>在 application.yml 中配置 Actuator 端点,启用所需的监控功能。
server: port: 8080 management: endpoints: web: exposure: include: health, metrics, info, mappings, env, conditions, loggers, threaddump endpoint: health: show-details: always metrics: enable: all: true info: enabled: true mappings: enabled: true env: enabled: true conditions: enabled: true loggers: enabled: true threaddump: enabled: true trace: http: enabled: true创建一个 MonitoringController,用于展示 Actuator 的监控数据。
package com.icoderoad.actuator_demo.controller;import org.springframework.boot.actuate.env.EnvironmentEndpoint;import org.springframework.boot.actuate.health.HealthEndpoint;import org.springframework.boot.actuate.info.InfoEndpoint;import org.springframework.boot.actuate.logging.LoggersEndpoint;import org.springframework.boot.actuate.management.ThreadDumpEndpoint;import org.springframework.boot.actuate.metrics.MetricsEndpoint;import org.springframework.web.bind.annotation.GetMapping;import org.springframework.web.bind.annotation.RequestMapping;import org.springframework.web.bind.annotation.RestController;import java.util.HashMap;import java.util.Map;@RestController@RequestMapping("/monitoring")public class MonitoringController { private final HealthEndpoint healthEndpoint; private final MetricsEndpoint metricsEndpoint; private final InfoEndpoint infoEndpoint; private final EnvironmentEndpoint environmentEndpoint; private final LoggersEndpoint loggersEndpoint; private final ThreadDumpEndpoint threadDumpEndpoint; public MonitoringController(HealthEndpoint healthEndpoint, MetricsEndpoint metricsEndpoint, InfoEndpoint infoEndpoint, EnvironmentEndpoint environmentEndpoint, LoggersEndpoint loggersEndpoint, ThreadDumpEndpoint threadDumpEndpoint) { this.healthEndpoint = healthEndpoint; this.metricsEndpoint = metricsEndpoint; this.infoEndpoint = infoEndpoint; this.environmentEndpoint = environmentEndpoint; this.loggersEndpoint = loggersEndpoint; this.threadDumpEndpoint = threadDumpEndpoint; } @GetMapping public Map<String, Object> getMonitoringData() { Map<String, Object> monitoringData = new HashMap<>(); monitoringData.put("health", healthEndpoint.health()); monitoringData.put("metrics", metricsEndpoint.listNames()); monitoringData.put("info", infoEndpoint.info()); monitoringData.put("environment", environmentEndpoint.environment(null)); // 返回环境属性描述符 monitoringData.put("loggers", loggersEndpoint.loggers()); monitoringData.put("threaddump", threadDumpEndpoint.threadDump()); return monitoringData; }}创建一个新的接口 /menu,用于提供用户菜单数据。
package com.icoderoad.actuator_demo.controller;import java.util.List;import java.util.Map;import org.springframework.web.bind.annotation.GetMapping;import org.springframework.web.bind.annotation.RequestMapping;import org.springframework.web.bind.annotation.RestController;@RestController@RequestMapping("/api")public class UserController { @GetMapping("/menu") public List<Map<String, String>> getMenu() { // 模拟返回用户菜单 return List.of( Map.of("name", "首页", "url", "/home"), Map.of("name", "用户管理", "url", "/users"), Map.of("name", "设置", "url", "/settings") ); }}package com.icoderoad.actuator_demo.controller;import org.springframework.stereotype.Controller;import org.springframework.web.bind.annotation.GetMapping;@Controllerpublic class IndexController { @GetMapping("/") public String index() { return "index"; }}在 src/main/resources/templates 目录下创建或更新 monitoring.html 文件,以展示 Actuator 监控数据和测试接口结果。
<!DOCTYPE html><html lang="en"><head> <meta charset="UTF-8"> <meta name="viewport" content="width=device-width, initial-scale=1.0"> <title>接口监控</title> <link rel="stylesheet" href="https://stackpath.bootstrapcdn.com/bootstrap/5.2.3/css/bootstrap.min.css"> <script src="https://code.jquery.com/jquery-3.6.0.min.js"></script> <style> .container { width: 40%; margin: 40px auto; } pre { white-space: pre-wrap; /* Allow text to wrap within the element */ word-wrap: break-word; /* Break long words */ } </style></head><body> <div class="container mt-5"> <h1>接口监控</h1> <!-- 接口健康状态 --> <div class="mt-3"> <h3>接口健康状态</h3> <button class="btn btn-info" onclick="toggleContent('health', fetchHealth)">显示健康状态</button> <pre id="health" style="display: none;"></pre> </div> <!-- 可用指标 --> <div class="mt-3"> <h3>可用指标</h3> <button class="btn btn-info" onclick="toggleContent('metrics', fetchMetrics)">显示可用指标</button> <pre id="metrics" style="display: none;"></pre> </div> <!-- 环境属性 --> <div class="mt-3"> <h3>环境属性</h3> <button class="btn btn-info" onclick="toggleContent('environment', fetchEnvironment)">显示环境属性</button> <pre id="environment" style="display: none;"></pre> </div> <!-- 日志级别 --> <div class="mt-3"> <h3>日志级别</h3> <button class="btn btn-info" onclick="toggleContent('loggers', fetchLoggers)">显示日志级别</button> <pre id="loggers" style="display: none;"></pre> </div> <!-- 线程转储 --> <div class="mt-3"> <h3>线程转储</h3> <button class="btn btn-info" onclick="toggleContent('threaddump', fetchThreadDump)">显示线程转储</button> <pre id="threaddump" style="display: none;"></pre> </div> <!-- 用户菜单 --> <div class="mt-3"> <h3>用户菜单</h3> <a href="#" class="btn btn-primary" onclick="fetchUserMenu()">访问用户菜单接口</a> <div id="menu-result" class="mt-2"></div> </div> </div> <script> function fetchMonitoringData() { fetch('/monitoring') .then(response => response.json()) .then(data => { // Store the data in the global scope for later use window.monitoringData = data; }) .catch(error => console.error('Error fetching monitoring data:', error)); } function fetchHealth() { if (!window.monitoringData) { fetchMonitoringData(); return; } return JSON.stringify(window.monitoringData.health, null, 2); } function fetchMetrics() { if (!window.monitoringData) { fetchMonitoringData(); return; } return JSON.stringify(window.monitoringData.metrics, null, 2); } function fetchEnvironment() { if (!window.monitoringData) { fetchMonitoringData(); return; } return JSON.stringify(window.monitoringData.environment, null, 2); } function fetchLoggers() { if (!window.monitoringData) { fetchMonitoringData(); return; } return JSON.stringify(window.monitoringData.loggers, null, 2); } function fetchThreadDump() { if (!window.monitoringData) { fetchMonitoringData(); return; } return JSON.stringify(window.monitoringData.threaddump, null, 2); } function fetchUserMenu() { fetch('/api/menu') .then(response => response.json()) .then(data => { document.getElementById('menu-result').textContent = JSON.stringify(data, null, 2); }) .catch(error => console.error('Error fetching user menu:', error)); } function toggleContent(id, fetchFunction) { const content = document.getElementById(id); const button = event.target; if (content.style.display === 'none') { // Display content content.textContent = fetchFunction(); content.style.display = 'block'; button.textContent = `隐藏${button.textContent.substring(2)}`; } else { // Hide content content.style.display = 'none'; button.textContent = `显示${button.textContent.substring(2)}`; } } // Trigger fetchMonitoringData on page load window.onload = function() { fetchMonitoringData(); } </script></body></html>通过以上步骤,你可以轻松验证 Actuator 的 HTTP 请求追踪功能,并在页面上测试用户菜单接口。这样不仅能够展示 Actuator 的强大功能,还可以检查和调试接口的响应数据。这篇文章希望能帮助大家有效地实现和利用 Spring Boot 的监控功能,并提升系统的管理和维护能力。
本文链接://www.dmpip.com//www.dmpip.com/showinfo-26-112780-0.html超赞!Spring Boot 3.3 自带 Controller 接口监控,大家赶紧用起来
声明:本网页内容旨在传播知识,若有侵权等问题请及时与本网联系,我们将在第一时间删除处理。邮件:2376512515@qq.com
上一篇: PHP异步非阻塞MySQL客户端连接池